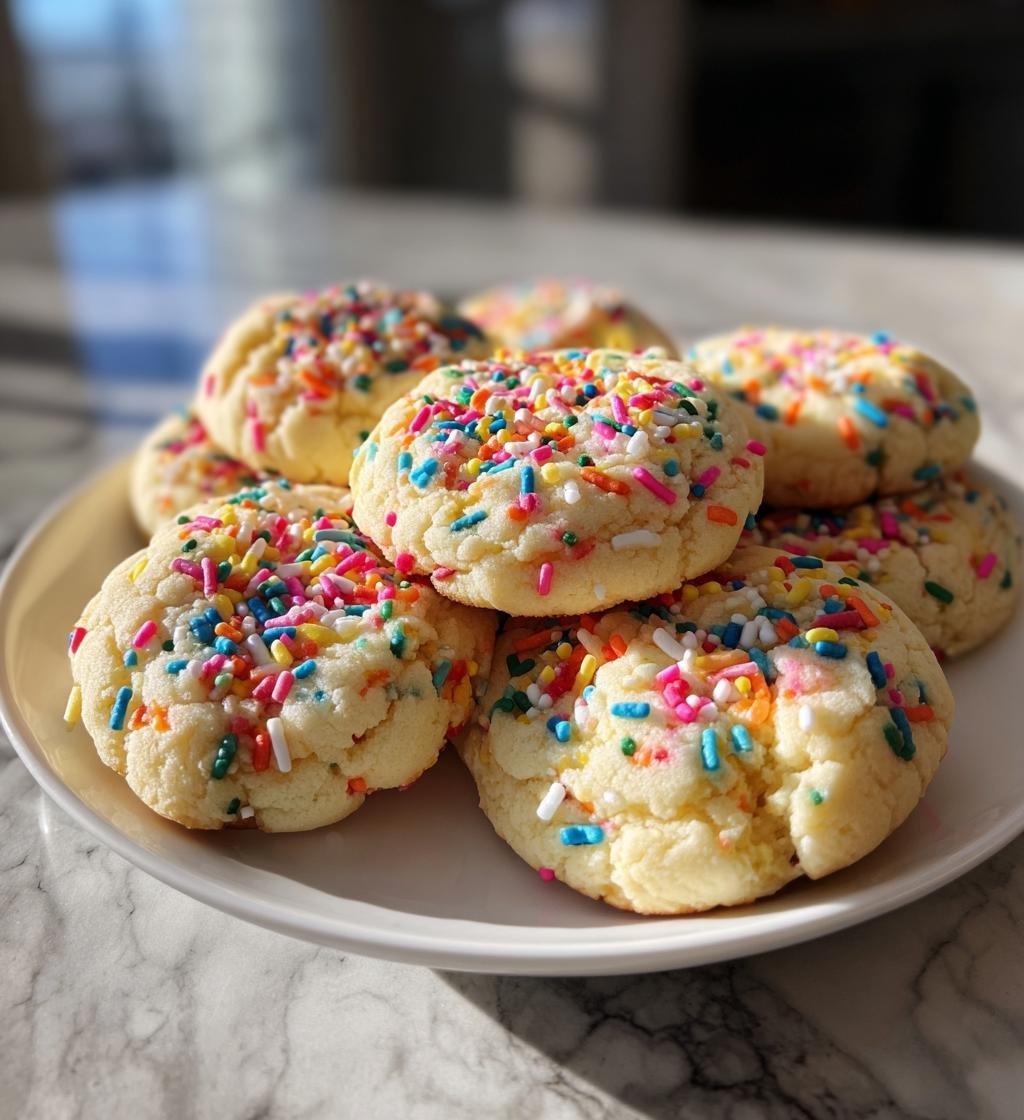
Spring is in the air, and what better way to celebrate the season than with a batch of delightful spring cookies? These cookies are not just any ordinary treat; they’re bursting with color and joy, perfect for brightening up any occasion! I remember the first time I baked these beauties for a gathering in my backyard. The moment I pulled them from the oven, the sweet aroma wafted through the air, and friends started flocking to the kitchen, drawn by the irresistible scent and vibrant sprinkles.
What I love most about these spring cookies is how simple yet versatile they are. With just a handful of ingredients, you can whip up a batch in no time, making them an ideal choice for last-minute celebrations or casual afternoons with family. Plus, the colorful sprinkles add a playful touch that makes them perfect for springtime festivities, from Easter brunch to birthday parties. Trust me, these cookies will bring a smile to everyone’s face and a little sunshine to your day!
Ingredients List
Gathering the right ingredients is crucial for making these delightful spring cookies. Here’s what you’ll need:
- 1 cup unsalted butter, softened: Make sure it’s at room temperature for easy creaming.
- 1 cup granulated sugar: This adds sweetness and helps achieve that perfect texture.
- 2 large eggs: Fresh eggs are key here; they bind everything together beautifully.
- 2 teaspoons vanilla extract: A splash of vanilla enhances the flavor and makes your kitchen smell divine.
- 3 cups all-purpose flour: This forms the base of your cookies, giving them structure.
- 1 teaspoon baking powder: This little leavening agent helps your cookies rise and stay fluffy.
- 1/2 teaspoon salt: A pinch of salt balances the sweetness and enhances all the flavors.
- 1 cup colorful sprinkles: The fun part! These add a burst of color and joy to your cookies.
With these simple but essential ingredients, you’re well on your way to baking the most cheerful spring cookies imaginable!
How to Prepare Spring Cookies
Getting ready to bake these delightful spring cookies is a breeze! Just follow these simple steps, and you’ll have a colorful batch in no time. Let’s get started!
Step 1: Preheat the Oven
First things first — you’ll want to preheat your oven to 350°F (175°C). This step is crucial because it ensures that your cookies bake evenly and turn out perfectly golden brown. While the oven warms up, you can tackle the next steps!
Step 2: Cream Butter and Sugar
Now, grab a large bowl and beat together the softened butter and granulated sugar until the mixture is smooth and creamy. This process is essential because it incorporates air, giving your cookies that lovely light texture we all crave. You’re aiming for a fluffy consistency that’s pale in color — think whipped butter, but sweeter!
Step 3: Incorporate Eggs and Vanilla
Next, add the eggs one at a time, mixing well after each addition. Then stir in the vanilla extract. This order is important! Adding eggs one at a time helps maintain the emulsion, ensuring a lovely, cohesive dough. Plus, that vanilla aroma will have your kitchen smelling divine!
Step 4: Combine Dry Ingredients
In a separate bowl, whisk together the all-purpose flour, baking powder, and salt. Mixing the dry ingredients beforehand helps evenly distribute the baking powder and salt throughout the flour, which is key for consistent rising and flavor. Just give it a good stir with a whisk or fork!
Step 5: Combine Wet and Dry Mixtures
Now, it’s time to bring it all together! Gradually add the dry mixture to the wet ingredients, stirring gently until just combined. This gradual mixing is vital to avoid overworking the dough, which can lead to tougher cookies. You want a smooth dough, but don’t worry if a few flour streaks remain!
Step 6: Add Sprinkles
Here comes the fun part! Gently fold in those colorful sprinkles. This step should be done with care, as you want to keep the sprinkles intact and vibrant. Don’t overmix; just a few folds should do the trick, ensuring they’re evenly distributed throughout the dough without losing their cheerful colors.
Step 7: Portion the Dough
Using a cookie scoop or a tablespoon, drop spoonfuls of dough onto your prepared baking sheet. Make sure to space them about 2 inches apart, as they’ll spread while baking. This spacing helps ensure that each cookie has room to grow without merging into one big cookie puddle!
Step 8: Bake the Cookies
Pop those cookies into the preheated oven and bake for about 10-12 minutes. You’ll know they’re ready when the edges turn golden brown, but the centers might still look a bit soft — that’s perfect! They’ll firm up as they cool, so don’t overbake them!
Step 9: Cooling Process
Once out of the oven, let the cookies cool on the baking sheet for about 5 minutes. This resting time allows them to set a bit. After that, carefully transfer them to a wire rack to cool completely. This step is essential for maintaining the right texture and ensuring they don’t become soggy from steam. Enjoy the sweet aroma while you wait!
Why You’ll Love These Spring Cookies
These delightful spring cookies aren’t just a treat for the taste buds; they’re a feast for the eyes and the heart! Here’s why you’ll absolutely adore them:
- Quick to Make: With just a few simple steps, you can whip up a batch in under 30 minutes — perfect for those last-minute gatherings!
- Colorful and Fun: The vibrant sprinkles make these cookies a celebration in every bite, adding a cheerful touch to any occasion.
- Perfect for Any Celebration: Whether it’s Easter, a birthday party, or just a sunny afternoon, these cookies fit right in, bringing joy to your table.
- Customizable: Feel free to mix in your favorite add-ins, like nuts or chocolate chips, to make them truly your own!
- Great for Sharing: These cookies are easy to transport, making them ideal for potlucks, picnics, or just sharing with friends and family.
Trust me, once you take a bite of these spring cookies, you’ll find it hard to resist going back for another! They truly embody the spirit of the season, bringing warmth and happiness to every gathering.
Tips for Success
To ensure your spring cookies turn out perfectly every time, I’ve gathered some tried-and-true tips that’ll help you on your baking journey. Let’s make these cookies the star of your spring celebrations!
- Use Room Temperature Ingredients: Make sure your butter and eggs are at room temperature. This helps them blend together more easily, creating a smooth and creamy dough.
- Don’t Skip the Preheating: Always preheat your oven! This step is crucial for the cookies to bake evenly. If your oven isn’t hot enough, they might spread too much or not rise properly.
- Measure Flour Accurately: Fluff up your flour with a spoon before scooping it into your measuring cup, then level it off with a knife. This prevents packing and ensures you don’t accidentally add too much flour, which can make your cookies dense.
- Chill the Dough for Thicker Cookies: If you prefer thicker cookies, consider chilling the dough for about 30 minutes before baking. This will help them hold their shape and prevent excessive spreading.
- Watch Baking Time Closely: Ovens can vary, so keep an eye on your cookies as they bake. Remember, they’ll continue to firm up while cooling on the baking sheet, so it’s okay if they look a little soft in the center when you take them out!
- Store Properly: To keep your cookies fresh, store them in an airtight container. This keeps them soft and chewy for days, but trust me, they’ll likely be gone before that!
With these tips in mind, you’ll be well on your way to baking up a batch of delightful spring cookies that everyone will love! Happy baking!
Variations for Spring Cookies
While these spring cookies are already a delightful treat on their own, there’s always room for creativity! Here are some fun variations to customize your cookies and make them uniquely yours:
- Add Nuts: Chopped walnuts or pecans bring a lovely crunch and a nutty flavor. Just fold in about 1 cup of your favorite nuts along with the sprinkles.
- Dried Fruits: Incorporate dried cranberries, cherries, or even apricots for a chewy texture and a pop of fruity flavor. Aim for about 1 cup and chop them into smaller pieces for even distribution.
- Chocolate Chips: For a delicious twist, mix in 1 cup of semi-sweet or white chocolate chips. The melty chocolate will pair beautifully with the sweetness of the cookies!
- Citrus Zest: Brighten up the flavor by adding the zest of one lemon or orange into the dough. It gives a refreshing zing that complements the sprinkles perfectly.
- Spices for Warmth: A dash of cinnamon or nutmeg can add a cozy warmth to your cookies. Just half a teaspoon will do — it’s a subtle touch that makes a difference!
- Different Sprinkles: While colorful sprinkles are a must for spring, consider using themed sprinkles for holidays or special occasions. Think pastel colors for Easter or red and green for Christmas!
These variations not only elevate your spring cookies but also allow you to experiment and find your favorite combination. Have fun mixing and matching, and let your creativity shine through in each batch!
Storage & Reheating Instructions
To keep your delightful spring cookies fresh and tasty, proper storage is key! Here’s how to do it right:
- Store in an Airtight Container: Once your cookies have completely cooled, transfer them to an airtight container. This helps prevent them from drying out and keeps them soft for several days.
- Layer with Parchment Paper: If you’re stacking your cookies, place a piece of parchment paper between layers to avoid sticking. This little trick keeps them looking and tasting their best!
- Keep at Room Temperature: Your cookies will stay fresh at room temperature for about 5 days. Just make sure they’re in a cool, dry place away from direct sunlight.
- For Longer Storage: If you want to keep them for longer, consider freezing them! Just wrap each cookie tightly in plastic wrap, then place them in a freezer-safe bag. They can last up to 3 months in the freezer!
- Reheating Tips: When you’re ready to enjoy your cookies again, you can reheat them to bring back that fresh-baked taste. Simply pop them in the microwave for about 10-15 seconds, or for a crisper texture, place them in a preheated oven at 350°F (175°C) for about 5 minutes. Just keep an eye on them to avoid over-baking!
With these storage and reheating tips, you’ll be able to savor your spring cookies just like they came out of the oven, bringing a little sunshine to your day whenever you crave a sweet treat!
Nutritional Information Disclaimer
It’s important to remember that nutritional values can vary based on the specific ingredients and brands you use in your spring cookies. The estimates provided are typical values based on standard ingredients, but your results may differ. For instance, using different brands of butter or sugar can alter the calorie count, and adding extra mix-ins will change the overall nutrition profile as well.
Here’s a general idea of the nutritional information per cookie:
- Calories: 150
- Sugar: 10g
- Sodium: 50mg
- Fat: 7g
- Saturated Fat: 4g
- Unsaturated Fat: 2g
- Trans Fat: 0g
- Carbohydrates: 20g
- Fiber: 0g
- Protein: 2g
- Cholesterol: 30mg
Always feel free to adjust the ingredients to suit your dietary needs or preferences, and enjoy your spring cookies with a smile, knowing you’ve got a treat that can be personalized just for you!
FAQ About Spring Cookies
Got questions about making these delightful spring cookies? Don’t worry, I’ve got you covered! Here are some common queries that pop up, along with my answers to help you bake your best batch yet.
- Q1: Can I use margarine instead of butter?
While you can substitute margarine, I always recommend using real unsalted butter for the best flavor and texture. Butter creates that rich, creamy consistency that makes these cookies so special! - Q2: How do I ensure my cookies stay soft?
The secret to soft cookies lies in not overbaking them! Keep an eye on them as they bake, and remember they’ll continue to firm up while cooling. Storing them in an airtight container also helps maintain their softness. - Q3: Can I make the dough ahead of time?
Absolutely! You can prepare the dough and refrigerate it for up to 3 days. Just be sure to let it sit at room temperature for a bit before baking, so it softens up a little for easier scooping. - Q4: What’s the best way to decorate these cookies?
These cookies are super versatile! You can drizzle them with icing or simply add more sprinkles on top right after you scoop them onto the baking sheet. Either way, they’ll look festive and fun! - Q5: Can I freeze these cookies after baking?
Yes, you can! Once cooled, store them in a freezer-safe bag or container. They’ll stay fresh for up to 3 months. Just thaw them at room temperature when you’re ready to enjoy a sweet treat!
If you have more questions or need tips beyond these, feel free to reach out. I’m always here to help you make the most scrumptious spring cookies ever!
Print
Spring Cookies: 7 Irresistible Treats to Brighten Your Day
- Total Time: 27 minutes
- Yield: 24 cookies 1x
- Diet: Vegetarian
Description
Delicious spring-themed cookies perfect for any occasion.
Ingredients
- 1 cup unsalted butter, softened
- 1 cup granulated sugar
- 2 large eggs
- 2 teaspoons vanilla extract
- 3 cups all-purpose flour
- 1 teaspoon baking powder
- 1/2 teaspoon salt
- 1 cup colorful sprinkles
Instructions
- Preheat your oven to 350°F (175°C).
- In a large bowl, cream together the butter and sugar until smooth.
- Beat in the eggs one at a time, then stir in the vanilla.
- In another bowl, mix flour, baking powder, and salt.
- Gradually add the dry ingredients to the wet ingredients.
- Fold in the sprinkles.
- Drop spoonfuls of dough onto a baking sheet.
- Bake for 10-12 minutes or until edges are golden.
- Let cookies cool on the baking sheet for 5 minutes before transferring them to a wire rack.
Notes
- Store cookies in an airtight container.
- These cookies can be decorated with icing or additional sprinkles.
- Chill the dough for 30 minutes for thicker cookies.
- Prep Time: 15 minutes
- Cook Time: 12 minutes
- Category: Dessert
- Method: Baking
- Cuisine: American
Nutrition
- Serving Size: 1 cookie
- Calories: 150
- Sugar: 10g
- Sodium: 50mg
- Fat: 7g
- Saturated Fat: 4g
- Unsaturated Fat: 2g
- Trans Fat: 0g
- Carbohydrates: 20g
- Fiber: 0g
- Protein: 2g
- Cholesterol: 30mg
Keywords: spring cookies, dessert, baking, cookies