Oh, let me tell you about the magic of traditional Irish food sweets! There’s something so delightful about these treats that just brings a smile to my face. They’re not just desserts; they’re little bites of history, showcasing Ireland’s rich culinary heritage. When I think of traditional Irish sweets, I picture cozy kitchens filled with the warmth of baking, laughter, and the irresistible scent of butter and sugar wafting through the air.
Growing up, my family would often whip up these sweets during special occasions. They’re easy to make and even easier to devour! Each recipe tells a story, passed down through generations, and they remind me of all those joyful gatherings with family and friends. Trust me, once you taste these treats, you’ll understand why they hold such a special place in our hearts. So, roll up your sleeves and get ready to create your own delicious memories with these traditional Irish food sweets!
Ingredients for Traditional Irish Food Sweets
Gathering the right ingredients is a big part of the fun! Here’s what you’ll need to whip up these delightful traditional Irish food sweets:
- 1 cup granulated sugar: This sweetener is essential for that lovely sugary goodness that binds everything together.
- 1/2 cup butter: Make sure it’s unsalted and at room temperature for smooth melting. It adds richness and flavor to our sweets!
- 1/4 cup milk: Whole milk works best here. It helps bring the mixture together and gives it a lovely, creamy texture.
- 2 cups rolled oats: These add heartiness and a chewy texture. Use old-fashioned oats for the best results.
- 1 cup shredded coconut: Grab unsweetened coconut for a subtle flavor that enhances the overall sweetness without being too overpowering.
- 1/2 cup chopped nuts: You can use walnuts, pecans, or whatever you love! They add a delightful crunch and depth of flavor.
- 1 tsp vanilla extract: This brings a warm, sweet aroma that elevates all the other flavors. Trust me, it’s worth it!
Having all these ingredients prepped and ready makes the cooking process a breeze. You’ll see how they come together to create something truly special!
How to Prepare Traditional Irish Food Sweets
Alright, let’s dive into the sweet-making adventure! Preparing these traditional Irish food sweets is a delightful experience, and I promise you’ll be amazed at how simple it is. Just follow these steps, and you’ll be rewarded with a tasty treat in no time!
- Melt the butter and sugar: Start by combining the 1/2 cup of butter and 1 cup of granulated sugar in a medium saucepan. Place it over low heat and stir gently until the butter melts and the sugar begins to dissolve. This should take about 2-3 minutes. Keep an eye on it; we don’t want it to boil yet!
- Add the milk: Once the butter and sugar are nicely melted, pour in 1/4 cup of milk. Now, increase the heat slightly and bring the mixture to a gentle boil, stirring constantly. This is where the magic starts to happen! Let it boil for about 1 minute. You’ll see it bubbling, and that’s when you know it’s ready to move on.
- Mix in the dry ingredients: Remove the saucepan from the heat and add in your star ingredients: 2 cups of rolled oats, 1 cup of shredded coconut, 1/2 cup of chopped nuts, and 1 tsp of vanilla extract. Stir everything together until it’s well combined. You want every morsel to be coated in that buttery, sugary goodness!
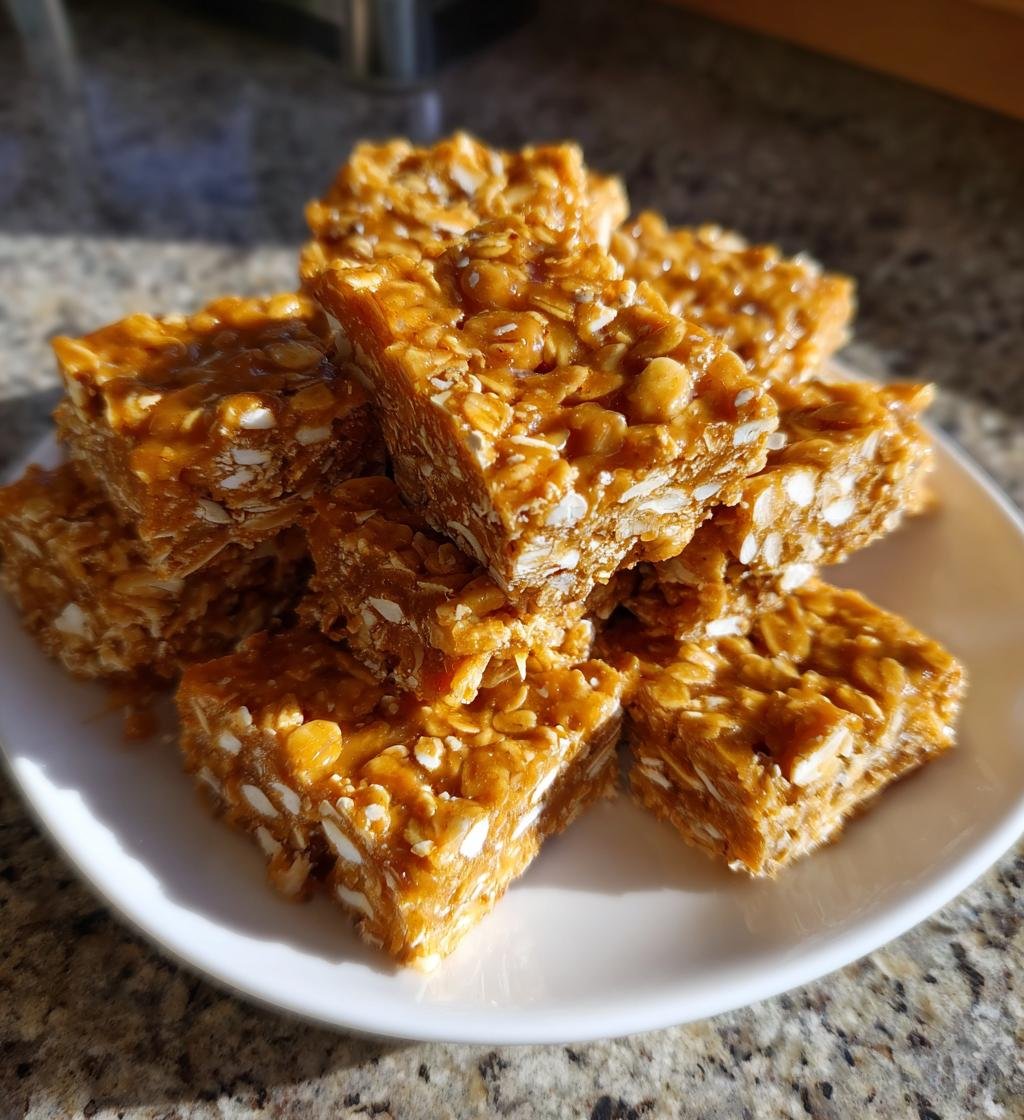
- Spread the mixture: Now, grab a greased baking sheet (or line it with parchment paper for easy removal). Pour the mixture onto the sheet and spread it out evenly. Use a spatula or the back of a spoon to smooth it down. It doesn’t have to be perfect—rustic is charming!
- Let it cool: This is the hardest part—waiting! Allow the mixture to cool completely in the baking sheet. If you can resist the temptation, let it sit for at least 30 minutes. This helps it set so you can cut it into those delightful squares later on.
And there you have it! These steps are straightforward, and I promise they’ll lead you to some delicious results. Just imagine cutting into those sweet squares, the aroma filling your kitchen—it’s simply heavenly!
Why You’ll Love This Recipe
Oh, where do I even begin? This traditional Irish food sweets recipe has so many things going for it that you’ll be head over heels in love with every bite! Here are just a few reasons why you absolutely need to try making these treats:
- Quick Preparation: With just 15 minutes of prep time and another 10 to cook, you’ll have scrumptious sweets ready in no time! Perfect for those surprise cravings!
- Simple Steps: The process couldn’t be easier! You’ll find it hard to mess up, even if you’re a newbie in the kitchen. Just melt, mix, and cool—it’s that simple!
- Flavorful Results: The combination of oats, coconut, and nuts creates a delightful texture and flavor explosion in your mouth. Each bite is a comforting hug!
- Traditional Appeal: You’re not just making sweets; you’re diving into a piece of Ireland’s rich culinary history. It’s a beautiful way to connect with tradition and share it with loved ones.
- Customizable: You can easily tweak the recipe to suit your taste! Whether you want to add chocolate drizzle or swap nuts, it’s all about making it your own!
Seriously, once you make these traditional Irish food sweets, you’ll be hooked! They’re perfect for sharing at gatherings or just enjoying with a cup of tea on a cozy afternoon. Trust me, you won’t regret it!
Tips for Success
To make sure your traditional Irish food sweets turn out perfectly every time, I’ve got some handy tips to keep in mind. These little nuggets of wisdom will help you avoid common pitfalls and ensure you’re left with delicious treats that everyone will love!
Watch the Heat
When melting the butter and sugar, keep it on low heat and stir constantly. If you let it get too hot and start boiling before adding the milk, you might end up with a grainy texture instead of that smooth, creamy mixture we’re after. Patience is key here!
Cool Completely
Letting the mixture cool completely before cutting is crucial. If you’re too eager and try to cut it while it’s still warm, you’ll end up with a sticky mess instead of neat squares. Trust me, it’s worth the wait for those perfect little bites!
Use Quality Ingredients
Always opt for good-quality butter and fresh ingredients. It makes a world of difference in flavor! Don’t skimp on the vanilla extract either; it really enhances the overall taste. You want these sweets to shine!
Grease or Line Your Baking Sheet
Whether you grease your baking sheet or line it with parchment, be sure to do this step. It prevents sticking and makes it so much easier to remove those delightful squares once they’ve set. Nobody wants a broken sweet, right?
Adjust to Your Sweetness Preference
If you like your sweets a little less sweet, feel free to adjust the sugar. You can always start with less and add more to taste. Just keep in mind that the sweetness balances beautifully with the coconut and oats, so find what works for you!
Keep these tips in mind, and I promise you’ll be well on your way to creating perfect traditional Irish food sweets that will have everyone coming back for seconds. Enjoy the process and happy baking!
Variations of Traditional Irish Food Sweets
Let’s talk about the fun part—getting creative with these traditional Irish food sweets! While the original recipe is absolutely delicious, you can easily tweak it to match your taste or use what you have on hand. Here are some variations that I just love:
Nutty Alternatives
If you want to switch it up, try using different nuts! Walnuts and pecans are classics, but how about adding slivered almonds or hazelnuts for a unique twist? Each variety brings its own flavor and texture, making your sweets even more exciting!
Chocolate Drizzle Delight
For all the chocolate lovers out there, a drizzle of melted dark or milk chocolate on top of your sweets takes them to a whole new level! Just melt some chocolate in the microwave or over a double boiler, then drizzle it over the cooled mixture before cutting into squares. It adds a touch of decadence that’s simply irresistible!
Sweetener Swaps
If you’re looking to reduce refined sugar, consider using natural sweeteners like honey or maple syrup. Just remember that these liquids may slightly change the texture, so you might need to adjust the amount of oats or coconut to balance it out. It’s a great way to make your sweets a bit healthier while still keeping them delightful!
Flavor Infusions
Feeling adventurous? Try adding a pinch of cinnamon or nutmeg to the mixture for a warm, spiced flavor. It’s a lovely way to celebrate the cozy vibes of these traditional sweets! You can also experiment with a splash of almond extract for a different aromatic twist.
Fruit Additions
Want a fruity touch? Throw in some dried fruits like raisins or cranberries! They’ll add a nice chewiness and a burst of flavor that complements the oats beautifully. You could even fold in some fresh berries if you’re enjoying these sweets right away!
These variations allow you to have fun with the recipe while keeping its heart intact. Don’t be afraid to mix and match to find your perfect combination! Each twist tells a new story and creates even more cherished memories in the kitchen. Happy experimenting!
Storage & Reheating Instructions
Now that you’ve made these delicious traditional Irish food sweets, you might be wondering how to keep them fresh for later enjoyment. Luckily, storing them is super easy, and I’ve got you covered with some handy tips!
Storing Your Sweets
To keep your sweets fresh, you’ll want to store them in an airtight container. This helps maintain that delightful texture and prevents them from drying out. If you’ve cut them into squares, you can layer them with parchment paper between each piece to keep them from sticking together. Trust me, this little step makes all the difference!
They’ll stay fresh at room temperature for about 3-5 days. If you want to keep them longer, consider refrigerating them. Just be aware that the cold might change the texture a bit. They’ll last up to two weeks in the fridge—if they last that long!
Freezing for Later
If you want to save some for a rainy day (or just to keep them out of reach!), you can freeze these sweets! Cut them into squares and place them in a single layer on a baking sheet to freeze for about an hour. Once they’re firm, transfer them to an airtight container or freezer bag, separating layers with parchment paper. They should keep well for up to three months.
When you’re ready to enjoy them again, just take them out of the freezer and let them sit at room temperature for about 30 minutes to an hour. This way, they’ll regain that lovely texture you love!
Reheating Tips
If you prefer your sweets warm (who doesn’t?), you can reheat them in the microwave. Pop a piece on a microwave-safe plate and heat it for about 10-15 seconds. Keep an eye on it to avoid overheating, as you want to warm it up, not melt it into a gooey mess!
Alternatively, you can warm them in the oven. Preheat your oven to 350°F (175°C), place the squares on a baking sheet, and heat for about 5-7 minutes. This method brings back that lovely texture without getting them too hot.
With these storage and reheating tips, you’ll be able to enjoy your traditional Irish food sweets days after making them. Whether you savor them fresh or warm them up for a cozy treat, they’re sure to bring a smile to your face every time!
Nutritional Information Disclaimer
As you embark on your delightful journey with these traditional Irish food sweets, it’s good to keep in mind the nutritional aspects! The values provided here are typical estimates based on the ingredients used, and may vary depending on specific brands or modifications you make.
Each piece of these scrumptious treats contains approximately:
- Calories: 150
- Sugar: 10g
- Sodium: 50mg
- Fat: 8g
- Saturated Fat: 5g
- Unsaturated Fat: 2g
- Trans Fat: 0g
- Carbohydrates: 19g
- Fiber: 2g
- Protein: 2g
- Cholesterol: 15mg
Remember, these numbers are just guidelines to help you enjoy your sweets with a bit of awareness. Feel free to adjust the ingredients to suit your dietary preferences while still indulging in the joy of making and sharing these lovely treats!
Frequently Asked Questions
Let’s tackle some of the most common questions I get about these delightful traditional Irish food sweets! I know you might have some burning questions, so here are the answers to help you on your sweet-making journey:
Can I make these sweets ahead of time?
Absolutely! These traditional Irish food sweets are perfect for making ahead. You can prepare them a day or two in advance, and they’ll stay fresh and delicious stored in an airtight container. Just let them cool completely before storing, and you’re good to go!
What are some good serving suggestions?
These sweets are fantastic on their own, but if you want to elevate your serving game, try pairing them with a nice cup of Irish tea or coffee. You can also serve them at gatherings alongside fresh fruit or a scoop of vanilla ice cream for a delightful twist!
How can I customize the sweetness level?
If you prefer your sweets less sweet, feel free to adjust the sugar to your liking. Start with a little less sugar than the recipe calls for, then taste the mixture before it cools. You can always add more if you want it sweeter, but remember that the oats and coconut will also contribute to the sweetness!
Are there gluten-free options for this recipe?
Yes! You can easily make these traditional Irish food sweets gluten-free by using certified gluten-free rolled oats. Just double-check the labels on your ingredients to ensure everything is gluten-free, and you’ll be enjoying these treats without any worries!
Can I use different types of nuts or add fruits?
Definitely! This recipe is super flexible. You can switch up the nuts to your favorites, like almonds or cashews, or even add in some dried fruits like raisins or cranberries for a fruity burst. It’s all about making it your own and enjoying the process!
I hope these answers help you feel more confident as you dive into making your traditional Irish food sweets! They’re all about having fun and creating delicious memories, so don’t hesitate to experiment and find what works best for you!
Print
Traditional Irish Food Sweets: 5 Delightful Recipes to Love
- Total Time: 25 minutes
- Yield: 16 pieces 1x
- Diet: Vegetarian
Description
A selection of traditional Irish sweets that showcase the rich culinary heritage of Ireland.
Ingredients
- 1 cup granulated sugar
- 1/2 cup butter
- 1/4 cup milk
- 2 cups rolled oats
- 1 cup shredded coconut
- 1/2 cup chopped nuts
- 1 tsp vanilla extract
Instructions
- In a saucepan, melt butter and sugar over low heat.
- Add milk and bring to a boil, stirring constantly.
- Remove from heat and stir in oats, coconut, nuts, and vanilla.
- Spread mixture onto a greased baking sheet.
- Let it cool and set before cutting into squares.
Notes
- Store in an airtight container.
- Can be made with dark chocolate drizzle on top.
- Adjust sweetness by adding more or less sugar.
- Prep Time: 15 minutes
- Cook Time: 10 minutes
- Category: Dessert
- Method: Stovetop
- Cuisine: Irish
Nutrition
- Serving Size: 1 piece
- Calories: 150
- Sugar: 10g
- Sodium: 50mg
- Fat: 8g
- Saturated Fat: 5g
- Unsaturated Fat: 2g
- Trans Fat: 0g
- Carbohydrates: 19g
- Fiber: 2g
- Protein: 2g
- Cholesterol: 15mg
Keywords: Irish sweets, traditional desserts, Irish cuisine