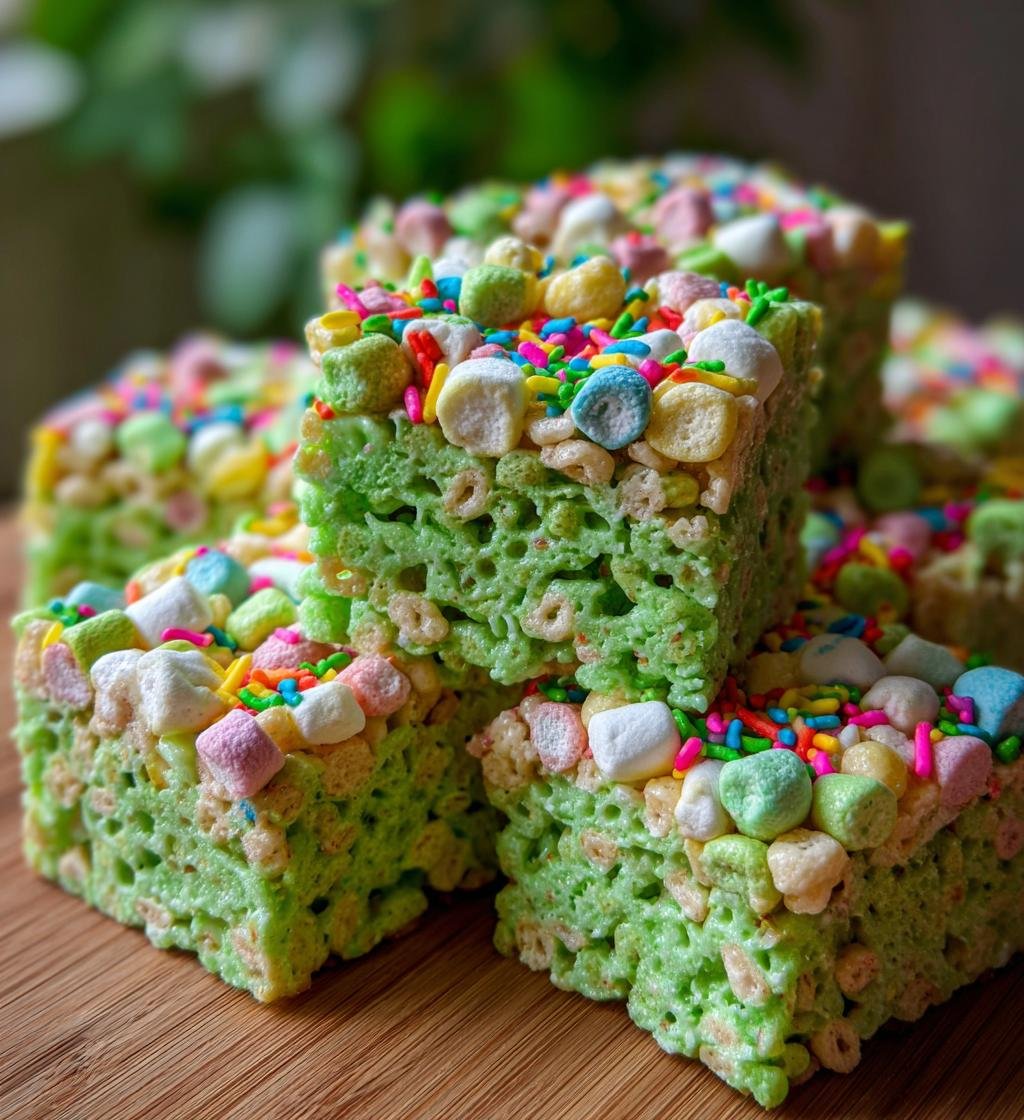
St. Patrick’s Day is such a magical time in the classroom, isn’t it? I mean, who doesn’t love a reason to celebrate with a splash of color and a sprinkle of fun? These classroom St. Patrick’s Day treats are not just delicious; they’re a festive way to bring a bit of joy and excitement to the day. Imagine the kids gathering around, their eyes lighting up at the sight of these vibrant, sweet squares! They’re perfect for sharing, and trust me, they’ll be a hit at any celebration.
What’s even better is how simple they are to whip up! With just a handful of ingredients, you can create these delightful treats that are sure to make your classroom feel a little more special. Let’s dive into the fun of making these delicious goodies that are as tasty as they are festive!
Ingredients List
To create these delightful classroom St. Patrick’s Day treats, you’ll need a few simple ingredients that pack a festive punch! Here’s what you’ll need:
- 1 cup green candy melts: These vibrant melts will give your treats that cheerful St. Patrick’s Day color. You can find them in most craft stores or baking aisles!
- 1 cup mini marshmallows: These fluffy little bites add sweetness and a fun texture to the mix. They’ll melt perfectly into the candy for that gooey goodness!
- 1 cup rice cereal: This is what gives our treats that delightful crunch. Plus, it helps balance out the sweetness of the candy and marshmallows.
- 1/2 cup chocolate chips: You can’t go wrong with chocolate! These will add a rich flavor that complements the sweetness of the other ingredients.
- 1/4 cup rainbow sprinkles: The finishing touch! These colorful sprinkles not only make the treats look festive but also add a little extra sweetness that’s just too fun to resist!
Gather these ingredients, and you’ll be ready to create some magical treats that your classroom will love! Let’s get started!
How to Prepare Classroom St Patrick’s Day Treats
Now that we’ve gathered our festive ingredients, it’s time to roll up our sleeves and get to the fun part – making these delightful classroom St. Patrick’s Day treats! Follow along with these simple steps to ensure your treats turn out perfectly every time. Trust me, it’s going to be a blast!
Step 1: Melt the Candy Melts
First things first: let’s melt those green candy melts! Grab a microwave-safe bowl and pour in your 1 cup of candy melts. Microwave them in 30-second intervals, stirring between each one, until they’re completely smooth and melted. This usually takes about 1 to 1.5 minutes total. Be careful not to overheat them, or they might seize up! You want them silky and ready to mix.
Step 2: Combine with Marshmallows
Once your candy melts are melted to perfection, it’s time to add the mini marshmallows. Dump in the 1 cup of marshmallows and stir gently until every fluffy piece is coated in that delicious green goodness. You want to make sure they’re all evenly covered to create that gooey, sweet base for our treats. It should look super fun and inviting!
Step 3: Add Rice Cereal
Next, let’s bring in the crunch! Add in your 1 cup of rice cereal and fold it into the marshmallow mixture. Take your time here, mixing gently but thoroughly, so every bit of cereal gets coated. This step is key to achieving that delightful texture we love! You want to see the cereal evenly distributed throughout, giving your treats that perfect crunch.
Step 4: Spread and Top
Now for the fun part! Grab a baking sheet lined with parchment paper and spread the mixture onto it. Use a spatula to flatten it out evenly, making sure to reach the corners. The thickness should be about 1 to 1.5 inches. Once it’s spread out, sprinkle those 1/2 cup of chocolate chips and 1/4 cup of rainbow sprinkles over the top. Press them down gently so they stick into the mixture. This adds that finishing festive touch that makes these treats pop!
Step 5: Allow to Cool
Finally, it’s time to let our treats cool and set. Leave them at room temperature for about 30 minutes, or until they’re firm to the touch. Once they’re set, take a sharp knife and cut them into squares. I like to make mine about 2 inches for easy snacking! And voila, your classroom St. Patrick’s Day treats are ready to be enjoyed!
Nutritional Information Section
It’s always nice to know what we’re munching on, right? Here’s the estimated nutritional breakdown for each square of these delightful classroom St. Patrick’s Day treats:
- Calories: 120
- Sugar: 10g
- Fat: 6g
- Saturated Fat: 3g
- Unsaturated Fat: 2g
- Trans Fat: 0g
- Carbohydrates: 15g
- Fiber: 1g
- Protein: 1g
- Cholesterol: 0mg
Keep in mind that these values are estimates, but they give you a good idea of what to expect. Enjoy these treats without worry, because they’re all about fun and celebration in the classroom!
Why You’ll Love This Recipe
These classroom St. Patrick’s Day treats are not just a feast for the eyes; they’re packed with benefits that make them a must-try for any festive celebration! Here’s why you’ll absolutely adore making and sharing them:
- Quick and Easy: With just a handful of ingredients and minimal prep time, you can whip these up in no time! Perfect for busy classroom days.
- No-Bake Fun: Forget about the oven! These treats set themselves with just a little time at room temperature, making them a safe and stress-free option for kids.
- Colorful and Festive: The vibrant green candy melts and cheerful rainbow sprinkles make these treats a delightful addition to any St. Patrick’s Day celebration.
- Customizable: Feel free to switch up the colors or toppings based on your classroom’s preferences! Use different candy melts or sprinkles for a personal touch.
- Great for Sharing: These treats are perfectly portioned into squares, making them easy to share with friends and classmates, spreading joy all around!
Trust me, once you see the smiles on those little faces, you’ll understand why these treats are a go-to for St. Patrick’s Day festivities in the classroom!
Tips for Success
Alright, let’s make sure your classroom St. Patrick’s Day treats turn out absolutely fabulous! I’ve gathered some handy tips that will help you navigate any hiccups you might encounter along the way and ensure your treats are a hit!
- Use a microwave-safe bowl: Always make sure your bowl is suitable for the microwave. Glass or ceramic works best! Avoid using plastic, as it can warp or melt.
- Stirring is key: When melting your candy melts, give them a good stir in between intervals. This helps distribute the heat evenly and keeps them from burning. If they seem a little thick after melting, just stir a bit longer – they should get nice and smooth!
- Don’t overcrowd the pan: When spreading the mixture on your baking sheet, make sure it’s evenly spread out. If it’s too thick, it may not set properly. Aim for that 1 to 1.5 inch thickness for perfect squares!
- Let them cool completely: Patience is a virtue here! Make sure to let your treats cool until they’re firm to the touch. If you try to cut them too early, you might end up with a gooey mess instead of perfect squares.
- Experiment with flavors: If you want to mix things up, consider adding a splash of vanilla extract or almond extract to the melted candy melts for an extra layer of flavor!
- Storage tips: Keep your treats stored in an airtight container to maintain their freshness! They can last for about a week, but trust me, they won’t last that long with all those hungry little hands around!
With these tips in hand, I’m sure your classroom St. Patrick’s Day treats will be a delightful success! Happy baking, and enjoy the smiles they bring!
Variations
One of the best things about these classroom St. Patrick’s Day treats is how easily customizable they are! You can mix things up to suit your classroom’s tastes or just to have a little fun with different colors and flavors. Here are some delightful variations to consider:
- Colorful Candy Melts: While green is a classic for St. Patrick’s Day, don’t hesitate to use other colors of candy melts! Pink, blue, or even a rainbow mix can add a vibrant twist that’s perfect for any festive occasion.
- Fun Flavor Additions: Try adding a splash of flavored extract to the melted candy melts! A little mint extract can give your treats a refreshing kick, perfect for the season!
- Different Mix-Ins: Get creative with your toppings! Swap the chocolate chips for butterscotch or white chocolate chips for a different flavor profile. You can also add crushed pretzels for a salty crunch or even chopped nuts for added texture.
- Seasonal Sprinkles: Instead of rainbow sprinkles, consider using themed sprinkles that match the holiday! Shamrocks, gold coins, or themed edible glitter can elevate your treats to the next level of festive fun!
- Layered Treats: For a fun twist, try layering your mixture in a square or rectangular pan. Alternate layers of different colors of melted candy melts to create a visually stunning treat that’s just as delicious!
- Mini Treats: For a fun twist, use a mini muffin tin to create bite-sized versions of your treats! Just make sure to adjust the cooling time accordingly, as they’ll set faster in smaller portions.
With these variations, you can truly make these treats your own and keep the excitement going in the classroom. The kids will love seeing how different flavors and colors create a whole new experience! Happy creating!
Serving Suggestions
When it comes to serving these delightful classroom St. Patrick’s Day treats, you want to create an atmosphere of fun and festivity that everyone can enjoy! Here are some ideas to elevate your treat presentation and make the celebration even more special:
- Festive Plates: Serve the treats on colorful, themed plates that match the St. Patrick’s Day spirit! Think green, gold, or even rainbow patterns to add that extra pop of joy to your classroom.
- Lucky Charms: Pair your treats with bowls of Lucky Charms cereal! It’s a fun, nostalgic touch that kids will love, and it ties perfectly into the holiday theme.
- Green Punch: Consider whipping up a batch of green punch or lemonade to go alongside the treats. It can be as simple as mixing lemon-lime soda with a splash of green food coloring or adding some lime sherbet for a frosty treat!
- Themed Napkins: Use napkins that feature shamrocks or leprechauns for an extra festive touch. Kids love little details like this, and it makes the whole experience feel special.
- Crafting Station: Set up a small crafting station where kids can make their own St. Patrick’s Day decorations or cards. It’s a great way to engage them while they enjoy their treats, making it a full festive experience!
- Storytime Corner: Create a cozy corner where you can read fun St. Patrick’s Day stories while everyone munches on their treats. It’s a perfect way to tie in learning with celebration!
By pairing these treats with fun drinks, decorations, and engaging activities, you’ll create a memorable St. Patrick’s Day celebration in the classroom that everyone will cherish. Trust me, the kids will be buzzing with excitement and joy, making it a day worth remembering!
Storage & Reheating Instructions
Now that you’ve whipped up these scrumptious classroom St. Patrick’s Day treats, you might be wondering how to keep them fresh for later enjoyment. Don’t worry; I’ve got you covered with some straightforward storage tips!
To store your leftover treats, simply place them in an airtight container. This will help maintain their delightful texture and keep them from getting stale. They can last about a week at room temperature, but I bet they won’t last that long with all the eager little hands around!
If you want to keep them even fresher, you can also refrigerate them. Just make sure they’re sealed tightly in that container to prevent any moisture from getting in. When you’re ready to enjoy them again, let them sit at room temperature for a few minutes to soften up a bit before digging in.
As for reheating, these treats are best enjoyed at room temperature. However, if you find that they’ve lost a bit of their gooeyness, you can pop them in the microwave for just a few seconds—about 5 to 10 seconds should do the trick! This will bring back their soft, melty goodness without turning them into a gooey mess. Just be careful not to overheat them, or they might lose that delightful texture!
By following these storage and reheating tips, you’ll ensure your classroom St. Patrick’s Day treats remain a delicious sweet treat for days to come. Enjoy every last bite!
Print
Classroom St Patrick’s Day Treats: 5 Reasons to Celebrate
- Total Time: 25 minutes
- Yield: 24 squares 1x
- Diet: Vegetarian
Description
Fun and festive treats for St. Patrick’s Day to enjoy in the classroom.
Ingredients
- 1 cup green candy melts
- 1 cup mini marshmallows
- 1 cup rice cereal
- 1/2 cup chocolate chips
- 1/4 cup rainbow sprinkles
Instructions
- Melt the green candy melts in a microwave-safe bowl.
- Add mini marshmallows and stir until coated.
- Mix in rice cereal until well combined.
- Spread the mixture onto a baking sheet lined with parchment paper.
- Sprinkle chocolate chips and rainbow sprinkles on top.
- Let it cool until set, then cut into squares.
Notes
- Store treats in an airtight container.
- Use different colors of candy melts for variety.
- These treats can be made ahead of time.
- Prep Time: 15 minutes
- Cook Time: 10 minutes
- Category: Dessert
- Method: No-Bake
- Cuisine: American
Nutrition
- Serving Size: 1 square
- Calories: 120
- Sugar: 10g
- Sodium: 50mg
- Fat: 6g
- Saturated Fat: 3g
- Unsaturated Fat: 2g
- Trans Fat: 0g
- Carbohydrates: 15g
- Fiber: 1g
- Protein: 1g
- Cholesterol: 0mg
Keywords: classroom st patricks day treats, festive treats, St. Patrick's Day desserts