Welcome to the whimsical world of Seuss! There’s something truly magical about creating snacks that are inspired by Dr. Seuss’s fantastical stories, isn’t there? These *Seuss snacks* are not just treats; they’re little bites of joy that bring out the kid in all of us. I mean, who wouldn’t want to munch on something that feels like it came straight from a storybook? With their vibrant colors and playful shapes, these snacks are perfect for parties, playdates, or just a fun afternoon treat with the family.
What I love most about these *Seuss snacks* is how simple they are to make yet so delightful to eat. You can whip them up in no time, and they’re always a hit with kids and adults alike! Trust me, when you present these colorful goodies, you’ll hear the giggles, and you’ll see the smiles as everyone dives in. So roll up your sleeves, grab your ingredients, and let’s get ready to embark on a delicious adventure that would make Dr. Seuss proud!
Ingredients List
Gathering the right ingredients is half the fun of making these delightful *Seuss snacks*! Here’s everything you’ll need to create these whimsical treats:
- 1 cup of peanut butter: Choose creamy or crunchy based on your preference! Both work wonderfully.
- 1 cup of powdered sugar: This adds just the right sweetness and helps hold everything together.
- 2 cups of rice cereal: Look for the classic kind; this gives the snacks that delightful crunch!
- 1 cup of chocolate chips: Milk chocolate is my go-to, but dark chocolate adds a nice twist if you’re feeling adventurous.
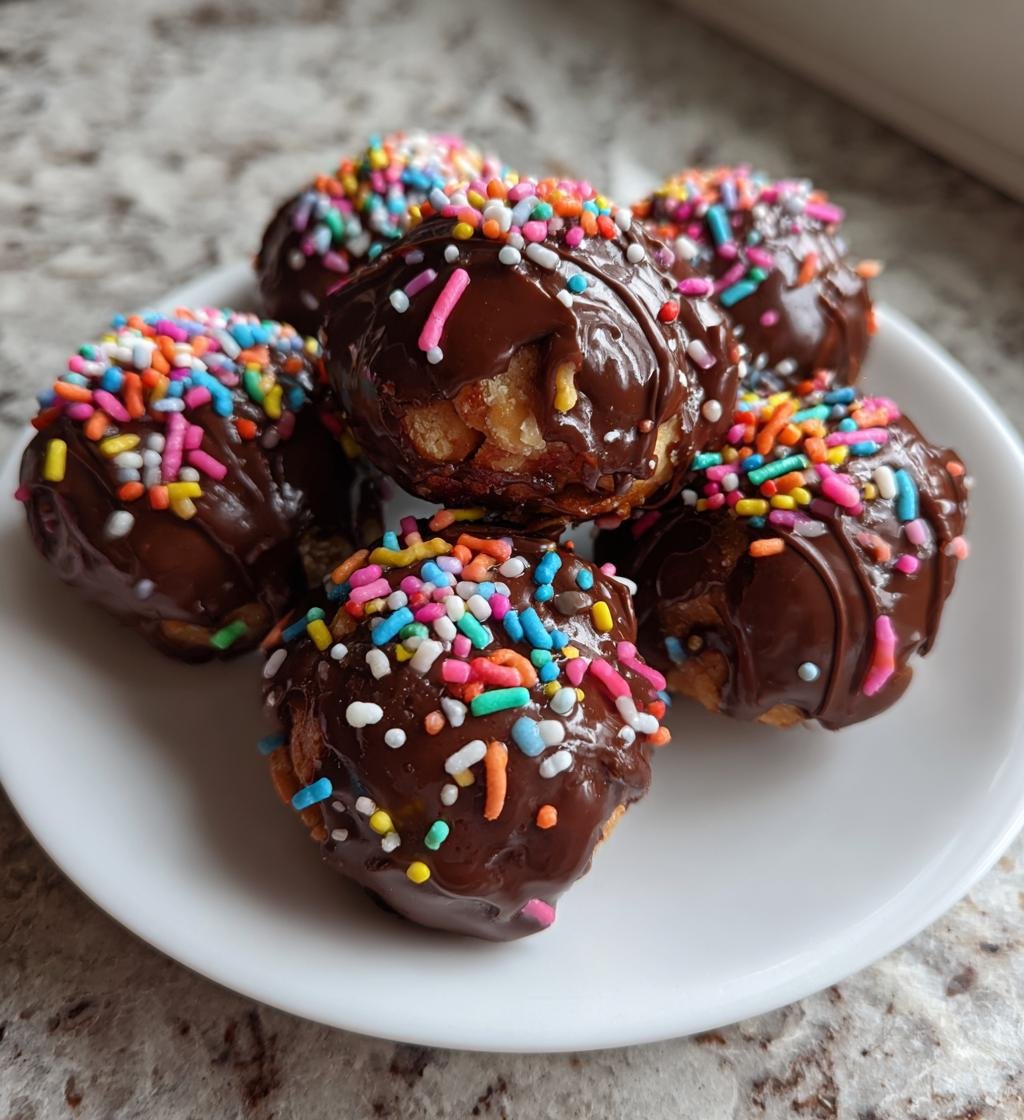
- 1/2 cup of colorful sprinkles: These are essential for that Seuss-like flair! Use your favorite colors to make them even more fun.
Having everything prepped and ready makes the whole process smoother, so feel free to measure out your ingredients ahead of time. Let’s get this Seuss-inspired party started!
How to Prepare *Seuss Snacks*
Now that we’ve gathered all our colorful ingredients, it’s time to dive into the fun part—preparing our delightful *Seuss snacks*! This no-bake recipe is super simple, and I promise you’ll have a blast making it. Let’s break it down step by step:
Step 1: Mixing the Base
First things first, grab a large mixing bowl and add your peanut butter and powdered sugar. Now, here’s where the magic begins! Mix them together until you achieve a smooth, creamy consistency. I like to use a sturdy spatula or even my hands (clean, of course!) to really get in there. It should feel thick but not too sticky—just the right texture to hold everything together. If it’s too crumbly, don’t be shy to add a little more peanut butter!
Step 2: Incorporating Rice Cereal
Next up, it’s time to add the rice cereal. Gently fold the cereal into your peanut butter mixture. This part is crucial because you want to ensure the cereal is evenly coated without crushing it too much. We’re aiming for that delightful crunch in every bite, so take your time and mix it until all the cereal is nicely incorporated. Wow, you’re already halfway there!
Step 3: Shaping the Snacks
Now comes the fun part—shaping the mixture into balls! I usually scoop out about a tablespoon of the mixture and roll it between my palms to create small, uniform balls. You want them to be about the size of a golf ball, but feel free to make them smaller or larger based on your preference. Just remember, uniformity helps them look extra cute and makes it easier for everyone to grab a snack!
Step 4: Melting the Chocolate
Alright, let’s get our chocolate chips melted! Place them in a microwave-safe bowl and heat them in 30-second intervals. This is important—microwaves can be tricky, and we don’t want burnt chocolate! Stir in between each interval until the chocolate is smooth and fully melted. If you want to add a little flair, you can mix in a splash of coconut oil; it helps the chocolate stay glossy!
Step 5: Dipping and Decorating
Now that your chocolate is ready, it’s time to dip those adorable balls! Carefully drop each one into the melted chocolate, ensuring it’s fully coated. Then, use a fork to lift them out, letting any excess chocolate drip off before placing them on a sheet of parchment paper. Here’s a little tip: sprinkle those colorful sprinkles on top while the chocolate is still wet. This way, they’ll stick perfectly! Repeat until all your snacks are dipped, and then let them sit until the chocolate hardens. It won’t be long, and the anticipation will be worth it!
Tips for Success
Making *Seuss snacks* is all about having fun, but a few handy tips can help ensure they turn out perfectly every time! Trust me, these little nuggets of wisdom will make the process smoother and even more enjoyable.
- Measure Ingredients Accurately: Make sure to level off your measuring cups, especially for the powdered sugar. Too much can make the mixture too sweet and too little can affect the texture.
- Don’t Skip the Mixing: When combining the peanut butter and powdered sugar, take your time! A well-mixed base means better flavor and texture, so really get in there until it’s smooth.
- Keep the Chocolate Warm: If your chocolate starts to harden while you’re dipping, you can pop it back in the microwave for a few seconds to melt again. Just keep an eye on it to avoid any burning!
- Use Clean Hands: When shaping the balls, don’t hesitate to use your hands! Just make sure they’re clean. A little warmth from your palms can help shape the mixture better.
- Chill for Extra Firmness: If you find the mixture too soft to shape comfortably, throw it in the fridge for about 10 minutes. This will firm it up and make it easier to roll into balls.
- Experiment with Toppings: While colorful sprinkles are a must, feel free to get creative! Try crushed nuts, mini chocolate chips, or even shredded coconut for different textures and flavors.
With these tips in your back pocket, you’ll be well on your way to creating *Seuss snacks* that are not only delicious but also a visual treat. Happy snacking!
Variations of *Seuss Snacks*
One of the best parts about making *Seuss snacks* is how adaptable they are! You can easily switch things up to suit your tastes or dietary preferences. Here are some fun variations to consider that will keep the spirit of Dr. Seuss alive while adding your own twist:
Nut-Free Version
If you need a nut-free option, no problem! Just swap out the peanut butter for almond butter (if allergies aren’t a concern) or sunflower seed butter. Both will give you that creamy texture while keeping the flavors fun and delicious!
Try Different Cereals
Feeling adventurous? Switch up the rice cereal for something like Cheerios or Cornflakes! Each cereal brings its own unique crunch and flavor, making every batch a little different. You can even mix and match for extra fun!
Chocolate Variations
While milk chocolate is my go-to, dark chocolate adds a deliciously rich flavor. If you’re a white chocolate fan, go ahead and melt that instead! You can even drizzle melted chocolate in different colors for a playful look.
Fun Toppings
The topping possibilities are endless! Instead of just sprinkles, consider using:
- Chopped nuts: Almonds or walnuts add a nice crunch.
- Mini marshmallows: For a sweet, chewy surprise.
- Coconut flakes: Toasted coconut adds a tropical twist.
- Crushed candies: M&Ms, Skittles, or any small candies for bursts of color and sweetness!
Healthier Options
If you’re looking for a healthier take, try replacing half the peanut butter with unsweetened applesauce or mashed banana. This will reduce the calories and sugar while still keeping your snacks moist and delicious!
With these variations, you can let your imagination run wild and create *Seuss snacks* that are uniquely yours. Each time you make them, they can be a new adventure in flavor and fun! So go ahead, mix it up and enjoy the process!
Storage & Reheating Instructions
After all that fun making your delightful *Seuss snacks*, you might have a few leftovers (if they last that long!). Storing them properly ensures they stay fresh and delicious for days to come.
To store your *Seuss snacks*, simply place them in an airtight container. I recommend layering parchment paper between the snacks to prevent them from sticking together, especially if you’ve gone a little sprinkle crazy! Keep the container in a cool, dry place like your pantry for up to a week. If you want to keep them even longer, you can pop them in the fridge, where they’ll last for about two weeks.
Now, reheating isn’t necessary for these no-bake treats, but if you prefer them a little softer, you can let them sit at room temperature for a bit before enjoying. Just be careful not to leave them out too long—especially in warmer weather—so they don’t get too melty!
If you’ve made a big batch and want to freeze some for later, go ahead! Just ensure they’re in a freezer-safe container. They can be frozen for up to three months. When you’re ready to enjoy, simply take them out and let them thaw at room temperature. You might even find that they’re just as tasty straight from the freezer for a cool treat!
With these storage tips, your *Seuss snacks* will remain as cheerful and delicious as the day you made them. So go ahead, enjoy every last bite, and don’t forget to share the joy!
Nutritional Information
When it comes to *Seuss snacks*, it’s always nice to know what you’re munching on! Here’s a breakdown of the typical nutritional values for these delightful treats. Keep in mind that these are estimates and can vary based on the specific ingredients you choose:
- Serving Size: 2 snacks
- Calories: 150
- Total Fat: 8g
- Saturated Fat: 2g
- Unsaturated Fat: 5g
- Trans Fat: 0g
- Cholesterol: 0mg
- Sodium: 50mg
- Carbohydrates: 18g
- Fiber: 1g
- Sugar: 10g
- Protein: 3g
These *Seuss snacks* are not only fun but also provide a nice balance of flavors and textures. Enjoy them as a sweet treat in moderation, and you’ll feel just like you’re indulging in a whimsical world inspired by Dr. Seuss himself!
FAQ Section
Got questions about making *Seuss snacks*? Don’t worry; you’re not alone! Here are some of the most common queries I’ve come across, along with my answers to help you navigate your way through this fun recipe.
Q1: Can I use crunchy peanut butter instead of creamy?
Absolutely! Using crunchy peanut butter adds an extra layer of texture that can make your *Seuss snacks* even more delightful. Just keep in mind that the mixture might be a bit thicker, but it’ll still come together beautifully.
Q2: How long do these snacks last?
When stored properly in an airtight container, your *Seuss snacks* can last up to a week at room temperature. If you want them to stay fresh longer, you can keep them in the fridge for about two weeks. Just be sure to layer parchment paper between them to prevent sticking!
Q3: Can I make these snacks vegan?
Yes, you can easily make *Seuss snacks* vegan! Just swap out the peanut butter for a nut or seed butter that doesn’t contain any animal products, and choose dairy-free chocolate chips for dipping. You’ll still end up with a delicious treat that everyone can enjoy!
Q4: What if I don’t have rice cereal? Can I use something else?
Definitely! If you don’t have rice cereal on hand, you can use other cereals like Cheerios or Cornflakes, or even crushed graham crackers for a different flavor profile. Each option will give your *Seuss snacks* a unique crunch!
Q5: Can I make these snacks ahead of time?
Yes! *Seuss snacks* are perfect for making ahead. You can whip them up a day or two in advance and store them in your airtight container. This makes them a fantastic option for parties or gatherings—just make sure to keep them hidden until it’s time to share!
Hopefully, these answers help clear up any uncertainties you might have about making your *Seuss snacks*. Enjoy the process, and don’t forget to have fun with it!
Print
seuss snacks: 5 Fun Recipes to Delight Your Inner Child
- Total Time: 25 minutes
- Yield: 24 snacks 1x
- Diet: Vegetarian
Description
Delicious snacks inspired by Dr. Seuss’s whimsical world.
Ingredients
- 1 cup of peanut butter
- 1 cup of powdered sugar
- 2 cups of rice cereal
- 1 cup of chocolate chips
- 1/2 cup of colorful sprinkles
Instructions
- In a bowl, mix peanut butter and powdered sugar until smooth.
- Add rice cereal and stir until well combined.
- Shape the mixture into small balls.
- Melt chocolate chips in a microwave.
- Dip each ball into melted chocolate and place on parchment paper.
- Sprinkle colorful sprinkles on top before chocolate hardens.
Notes
- Store snacks in an airtight container.
- Use almond butter for a nut-free version.
- Experiment with different toppings for variety.
- Prep Time: 15 minutes
- Cook Time: 10 minutes
- Category: Dessert
- Method: No-bake
- Cuisine: American
Nutrition
- Serving Size: 2 snacks
- Calories: 150
- Sugar: 10g
- Sodium: 50mg
- Fat: 8g
- Saturated Fat: 2g
- Unsaturated Fat: 5g
- Trans Fat: 0g
- Carbohydrates: 18g
- Fiber: 1g
- Protein: 3g
- Cholesterol: 0mg
Keywords: seuss snacks, fun snacks, kids snacks