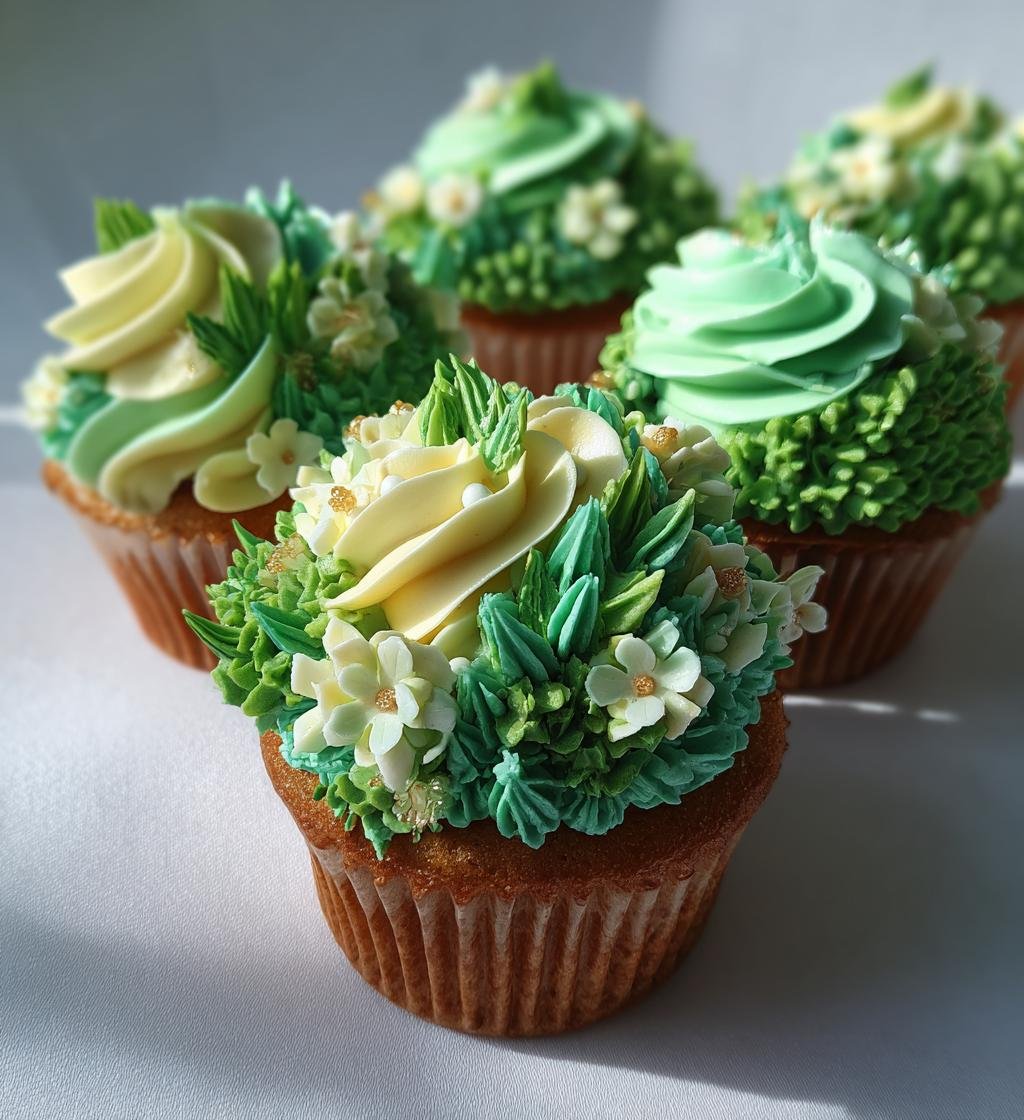
Spring is in the air, and let me tell you, there’s nothing quite like the joy of baking up a batch of delightful spring cupcakes! These little beauties are not just any cupcakes; they’re fluffy, colorful bites of happiness that celebrate the vibrant spirit of the season. The first time I made these, I was instantly hooked. The smell of vanilla and buttery goodness wafting through the house was pure magic!
What I love most about these spring cupcakes is their versatility. You can dress them up with fluffy frosting and cheerful decorations or keep them simple for an everyday treat. Trust me, they’re perfect for any occasion—be it a spring gathering, a birthday party, or simply a sunny afternoon snack on the porch. Plus, they’re so easy to whip up, you’ll find yourself making them over and over again. So, grab your apron, and let’s dive into the world of spring cupcakes that will surely bring a smile to your face!
Ingredients for Spring Cupcakes
Here’s everything you’ll need to create these delightful spring cupcakes. Each ingredient plays a role in crafting that fluffy texture and delicious flavor that’s simply irresistible!
- 1 1/2 cups all-purpose flour: The foundation of our cupcakes, giving them structure and that perfect crumb.
- 1 cup granulated sugar: This sweetens the batter and helps achieve that lovely golden crust.
- 1/2 cup unsalted butter, softened: Adds richness and moisture, making each bite feel luxurious.
- 2 large eggs: Essential for binding everything together and giving the cupcakes a nice lift.
- 1/2 cup milk: Keeps the batter moist and adds just the right amount of creaminess.
- 1 1/2 teaspoons baking powder: The magic leavening agent that helps our cupcakes rise beautifully.
- 1 teaspoon vanilla extract: A must-have for that irresistible aroma and flavor that makes everything better!
- 1/4 teaspoon salt: Enhances the sweetness and balances all the flavors perfectly.
- Green food coloring: To give our cupcakes that fresh, vibrant spring look—feel free to adjust the amount to get your desired shade!
- Frosting of choice: Whether you prefer classic buttercream or something zesty, it’s the finishing touch that brings everything together.
- Spring-themed decorations: Think sprinkles, edible flowers, or little candies to make your cupcakes pop with festivity!
Gather these ingredients, and you’ll be on your way to creating delightful spring cupcakes that everyone will love! Trust me, the process is just as fun as the end result!
How to Prepare Spring Cupcakes
Alright, let’s get those cupcakes baking! Follow these simple steps, and you’ll have a batch of fluffy spring cupcakes ready in no time. Just remember to have fun with it—baking is all about enjoying the process!
- Preheat your oven: Start by preheating your oven to 350°F (175°C). This is a crucial step! A properly heated oven ensures your cupcakes rise beautifully.
- Cream the butter and sugar: In a large mixing bowl, cream together the softened butter and granulated sugar until it becomes light and fluffy. This usually takes about 2-3 minutes with an electric mixer, and trust me, this step is key to getting that perfect texture!
- Add the eggs: Crack in the eggs one at a time, mixing well after each addition. This helps emulsify everything together—no one likes a lumpy batter!
- Mix in the liquids: Pour in the milk and vanilla extract, and stir until everything is combined. The batter should be smooth and creamy, making your kitchen smell absolutely heavenly!
- Combine dry ingredients: In a separate bowl, whisk together the all-purpose flour, baking powder, and salt. This ensures the leavening agent is evenly distributed throughout the flour.
- Mix dry into wet: Gradually add the dry ingredients to your wet mixture, stirring gently until just combined. Be careful not to overmix; a few lumps are completely fine!
- Add color: Now, it’s time for the fun part! Add green food coloring until you achieve your desired shade of spring green. Just a little goes a long way, so start small!
- Fill the cupcake liners: Line a cupcake tin with liners and carefully pour the batter into each one, filling them about 2/3 full. This gives them room to rise without overflowing.
- Bake to perfection: Pop your tray into the preheated oven and bake for about 18-20 minutes. Keep an eye on them, and use the toothpick test—insert one into the center, and if it comes out clean, they’re done!
- Cool before frosting: Once baked, let your cupcakes cool in the tin for about 5 minutes, then transfer them to a wire rack to cool completely before frosting. This step is important—frosting on warm cupcakes can lead to a melty mess!
And there you have it! Your spring cupcakes are ready for their final touch—frosting and decorating! Let your creativity shine through, and enjoy every bite of your delicious creations!
Nutritional Information for Spring Cupcakes
Now, let’s talk about the nutritional side of these delightful spring cupcakes. I always find it helpful to have an idea of what I’m indulging in, especially when it’s something as tempting as these little treats! Keep in mind that these values are estimates and can vary based on specific ingredients and portion sizes.
- Serving Size: 1 cupcake
- Calories: 200
- Fat: 8g
- Saturated Fat: 5g
- Unsaturated Fat: 2g
- Trans Fat: 0g
- Cholesterol: 30mg
- Sodium: 150mg
- Carbohydrates: 30g
- Fiber: 1g
- Sugar: 15g
- Protein: 2g
This little cupcake packs a delightful punch of sweetness and flavor, perfect for celebrating spring! Just remember, moderation is key to enjoying these scrumptious bites without worry. Happy baking!
Why You’ll Love This Recipe
These spring cupcakes are more than just a treat; they’re a celebration of the season! Here’s why I think you’ll absolutely adore making them:
- Quick and Easy: With just 15 minutes of prep time, you’ll have a batch of cupcakes ready to bake in no time—perfect for those last-minute gatherings!
- Delicious Flavor: Each bite is a delightful mix of buttery sweetness and rich vanilla, making it hard to stop at just one!
- Festive Appeal: Whether you’re decorating for a spring party or just brightening up your day, these cupcakes are a feast for the eyes with their vibrant colors and fun decorations.
- Customizable: You can easily switch up flavors or colors to match any occasion. Want lemon zest for a zesty kick? Go for it!
- Kid-Friendly Fun: Baking these cupcakes is a fantastic way to get the little ones involved in the kitchen. They’ll love helping with mixing and decorating!
Trust me, once you try these spring cupcakes, you’ll find yourself making them all season long! They’re just that good!
Tips for Success with Spring Cupcakes
Now that you’re all set to make those gorgeous spring cupcakes, let me share some of my best tips to ensure they turn out perfect every time! Trust me, a little extra care goes a long way in baking!
Perfecting Baking Times
Every oven is a bit different, so keep an eye on your cupcakes as they bake. Start checking for doneness around the 18-minute mark. Insert a toothpick into the center of a cupcake; if it comes out clean or with just a few moist crumbs, they’re ready to come out. If it comes out with wet batter, give them another minute or two, but don’t overbake! You want that fluffy texture, not a dry cupcake.
Frosting Techniques
When it comes to frosting, I recommend waiting until your cupcakes are completely cool. If you frost them while still warm, you’ll end up with a gooey mess (trust me, I’ve learned the hard way!). For a smooth application, use a butter knife or an offset spatula to spread your frosting evenly. If you’re feeling adventurous, try piping it with a pastry bag for a fancy touch! And don’t forget to have fun with your toppings—colorful sprinkles or edible flowers can make your cupcakes pop!
Storage Tips
To keep your cupcakes fresh, store them in an airtight container at room temperature. They’ll stay delicious for about 2-3 days. If you want to keep them longer, you can freeze them! Just wrap each cooled cupcake tightly in plastic wrap and place them in a freezer-safe container. When you’re ready to enjoy them, let them thaw at room temperature and frost as desired. You’ll have a delightful treat ready to brighten any day!
With these tips in your back pocket, you’ll be the spring cupcake champion in no time! Happy baking, and enjoy every delicious bite!
Variations on Spring Cupcakes
Now, let’s get a little creative with our spring cupcakes! The beauty of this recipe is its flexibility—there are so many ways to customize these little delights to make them truly your own. Here are some fun variations to consider!
Different Food Colorings
While green is a classic choice for spring, don’t be afraid to experiment with other colors! How about a cheerful yellow for a lemon-flavored cupcake, or a soft pink for a strawberry twist? You could even create a rainbow effect by dividing the batter into separate bowls and coloring each portion differently. Just imagine a box of colorful spring cupcakes ready to brighten up any gathering!
Flavor Infusions
Why not switch up the flavor profile a bit? You can easily infuse your cupcakes with different extracts! Consider adding almond extract for a nutty undertone or lemon zest for a bright, zesty flavor. You could even fold in some fresh berries or chocolate chips for added texture and taste. The possibilities are endless!
Seasonal Decorations
Decorating your spring cupcakes is half the fun! Try topping them with fresh fruit, like strawberries or raspberries, for a burst of color and flavor. Edible flowers are another beautiful option—imagine a cupcake adorned with delicate violets or pansies! You can also use themed sprinkles, like bunny or flower shapes, to add a festive touch. Let your imagination run wild!
Different Frosting Options
While classic buttercream is always a hit, why not try something different? A tangy cream cheese frosting pairs wonderfully with these cupcakes and adds a delicious twist. You could also whip up a light whipped cream topping or even a chocolate ganache for a richer treat. Just remember, the frosting is your canvas—get creative!
These variations will not only keep things interesting for you but will also impress your family and friends. So go ahead, mix it up, and create a batch of spring cupcakes that reflect your unique style and flavor preferences!
Serving Suggestions for Spring Cupcakes
Now that you’ve baked up a batch of those delightful spring cupcakes, let’s talk about how to serve them for a truly memorable dessert experience! Trust me, pairing these little treats with the right accompaniments can elevate your dessert game to a whole new level!
First off, these cupcakes shine at any spring gathering or celebration. Think of a lovely picnic in the park or a cheerful garden party. They pair beautifully with refreshing beverages! Try serving them alongside:
- Iced Lemonade: The tartness of lemonade complements the sweet, fluffy cupcakes perfectly. You can even serve it with a sprig of mint for that extra touch of freshness!
- Fruit-Infused Iced Tea: A light, fruity iced tea—think peach or berry—adds a delightful contrast to the cupcakes. It’s a combination that screams spring!
- Milk or Chocolate Milk: You can’t go wrong with the classic duo of cupcakes and milk! The creaminess of milk, especially chocolate milk, is a nostalgic pairing that everyone loves.
Now, if you’re hosting a special occasion, don’t forget to set out some delicious sides that harmonize with your spring cupcakes:
- Fresh Fruit Salad: A colorful bowl of mixed fruits adds a refreshing touch and balances the sweetness of the cupcakes. Berries, melons, and citrus fruits work wonderfully together!
- Cheese Platter: A small cheese platter with mild cheeses like brie or gouda can create an interesting flavor contrast. Throw in a few crackers, and you’ve got a sophisticated pairing!
- Mini Quiches: For a more savory option, mini quiches or savory tarts make a delightful addition to your dessert table. They’ll balance the sweetness of the cupcakes beautifully!
With these serving suggestions, you’ll create a dessert spread that not only looks stunning but tastes incredible too. So, get ready to impress your friends and family with your spring cupcakes and the delicious accompaniments that bring everything together! Enjoy every moment of this sweet celebration!
Storage & Reheating Instructions
Now that you’ve whipped up a batch of those scrumptious spring cupcakes, let’s talk about how to keep them fresh and delicious for as long as possible! Proper storage is key, especially when you want to enjoy every last bite of these delightful treats.
To store your cupcakes, simply place them in an airtight container at room temperature. This will help maintain their moisture and keep them fluffy. They’ll stay fresh for about 2-3 days—trust me, they won’t last long, but it’s good to know they can be enjoyed for a little while longer!
If you want to keep your spring cupcakes for an extended period, you can definitely freeze them! Just follow these simple steps:
- Cool Completely: Make sure your cupcakes are completely cooled before wrapping them. This prevents moisture buildup and keeps them from getting soggy.
- Wrap Individually: Wrap each cupcake tightly in plastic wrap. You want to seal in that freshness!
- Store in a Freezer-Safe Container: Place the wrapped cupcakes in a freezer-safe container or a resealable plastic bag. Make sure to label them with the date, so you know when they were made!
When you’re ready to enjoy your frozen cupcakes, simply take them out of the freezer and let them thaw at room temperature for about 1-2 hours. If you’ve frozen them without frosting, you can frost them once they’ve thawed for that fresh taste! If they’ve been frosted, just leave them to thaw as is.
And there you have it! With these storage and reheating tips, you’ll be able to savor your spring cupcakes whenever the craving strikes. Enjoy every delicious moment!
FAQ About Spring Cupcakes
Got questions about these delightful spring cupcakes? Don’t worry, I’ve got you covered! Here are some common questions that might pop up as you whip up your own batch of these tasty treats.
- Can I make these spring cupcakes ahead of time? Absolutely! You can bake the cupcakes a day in advance and store them in an airtight container. Just wait to frost them until the day you plan to serve them for the best results.
- What kind of frosting works best with spring cupcakes? While classic buttercream is a favorite, cream cheese frosting adds a delightful tang that pairs beautifully with the sweetness of the cupcakes. Feel free to get creative with flavors, like lemon or strawberry!
- Can I use gluten-free flour in this recipe? Yes, you can! Just substitute the all-purpose flour with a 1:1 gluten-free baking blend. It should work just fine, but be sure to check the specific blend’s instructions for best results.
- How do I know when my cupcakes are done baking? The toothpick test is key! Insert a toothpick into the center of a cupcake; if it comes out clean or with a few moist crumbs, they’re ready. Keep an eye on them around the 18-minute mark!
- What decorations can I use to make my cupcakes festive? Get creative! Use colorful sprinkles, fresh fruit, or edible flowers for a beautiful touch. You could even add themed decorations for holidays or special occasions!
I hope these answers help you as you embark on your spring cupcake adventure! Enjoy the baking process and the delicious results!
Print
spring cupcakes: 10 Delightful Treats to Brighten Your Day
- Total Time: 35 minutes
- Yield: 12 cupcakes 1x
- Diet: Vegetarian
Description
Delicious spring-themed cupcakes topped with fluffy frosting.
Ingredients
- 1 1/2 cups all-purpose flour
- 1 cup granulated sugar
- 1/2 cup unsalted butter, softened
- 2 large eggs
- 1/2 cup milk
- 1 1/2 teaspoons baking powder
- 1 teaspoon vanilla extract
- 1/4 teaspoon salt
- Green food coloring
- Frosting of choice
- Spring-themed decorations
Instructions
- Preheat the oven to 350°F (175°C).
- In a bowl, cream the butter and sugar together.
- Add eggs one at a time, mixing well after each.
- Stir in milk and vanilla extract.
- In a separate bowl, combine flour, baking powder, and salt.
- Gradually mix dry ingredients into wet mixture.
- Add green food coloring to achieve desired color.
- Pour batter into cupcake liners.
- Bake for 18-20 minutes or until a toothpick comes out clean.
- Let cool before frosting and decorating.
Notes
- Store cupcakes in an airtight container.
- Use different colors for frosting for variety.
- Experiment with flavors by adding zest or extracts.
- Prep Time: 15 minutes
- Cook Time: 20 minutes
- Category: Dessert
- Method: Baking
- Cuisine: American
Nutrition
- Serving Size: 1 cupcake
- Calories: 200
- Sugar: 15g
- Sodium: 150mg
- Fat: 8g
- Saturated Fat: 5g
- Unsaturated Fat: 2g
- Trans Fat: 0g
- Carbohydrates: 30g
- Fiber: 1g
- Protein: 2g
- Cholesterol: 30mg
Keywords: spring cupcakes