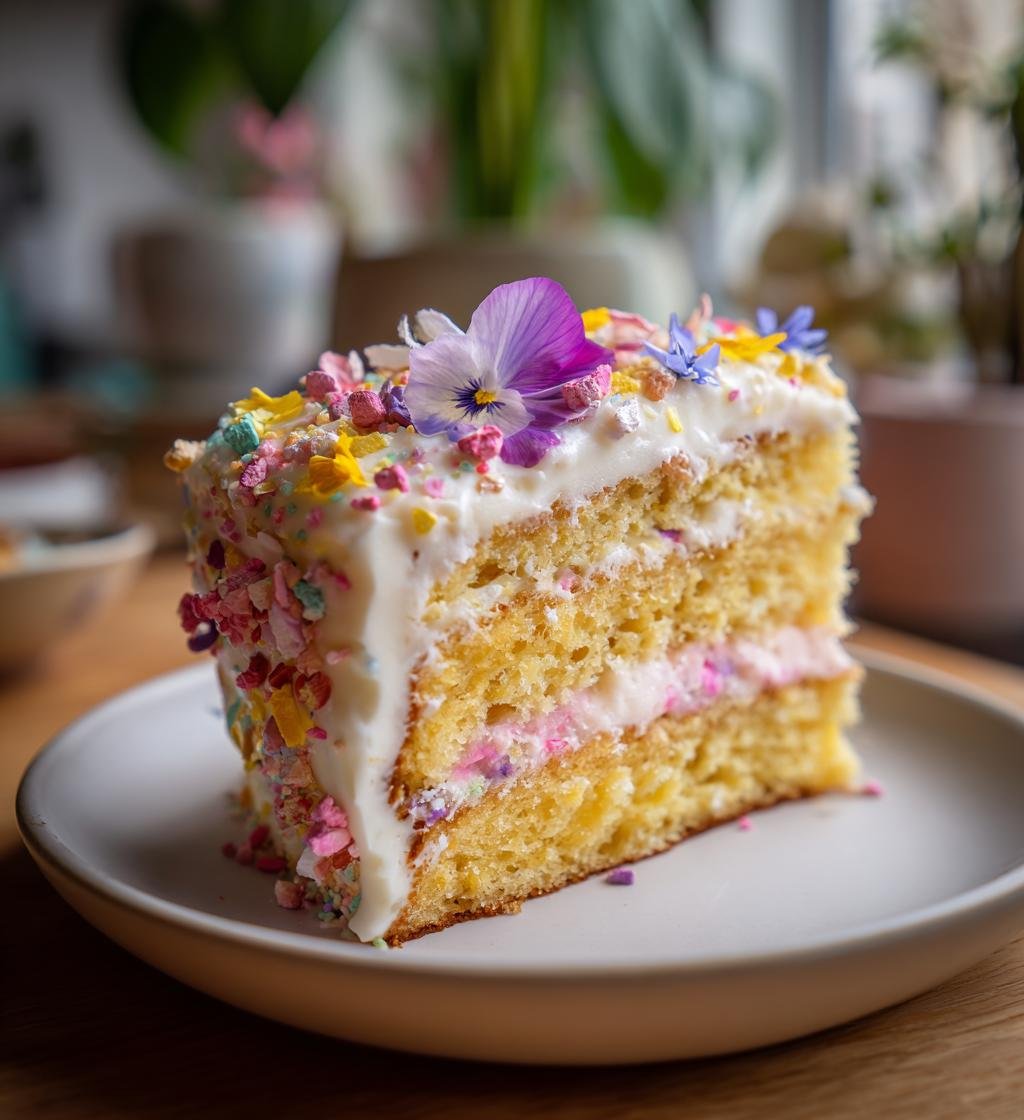
Ah, springtime! It’s that magical season when everything feels alive again. The flowers bloom, the birds chirp, and the sun shines a little brighter. Every spring celebration deserves a special touch, and that’s where *spring decorated cakes* come in. I can’t help but smile when I think of the joy these cakes bring to birthdays, graduations, or even just a lovely afternoon tea with friends. One of my favorite memories is baking a pastel-colored cake for my daughter’s spring-themed birthday party. We decorated it with edible flowers from our garden, and the delight on her face was priceless. It didn’t just taste wonderful; it also looked like a slice of spring itself! Trust me, there’s something incredibly uplifting about serving a cake that embodies the beauty of the season. Let’s dive into how you can create your own spring masterpiece that’s sure to impress!
Ingredients List
Gather these wonderful ingredients to create your delightful *spring decorated cakes*. Each one plays a crucial role in achieving that perfect balance of flavor and texture.
- 2 cups all-purpose flour, sifted: Sifting ensures a light and airy cake, so don’t skip this step!
- 1 1/2 cups granulated sugar: This sweetener gives your cake that lovely sweetness and helps with browning.
- 1 cup unsalted butter, softened: Make sure your butter is at room temperature for easy creaming. I like to leave it out for about an hour before I start.
- 4 large eggs: These add structure and moisture. Try to use fresh eggs for the best flavor.
- 1 cup milk: Whole milk works wonders for moisture, but you can use any milk you prefer. Just remember to bring it to room temperature!
- 2 teaspoons baking powder: This leavening agent is key for a fluffy cake, so check it’s fresh for the best rise.
- 1 teaspoon vanilla extract: Pure vanilla extract adds a beautiful aroma and flavor. I always opt for the good stuff!
- 1/2 teaspoon salt: A pinch of salt balances the sweetness and enhances all the flavors.
- Spring-themed decorations (edible flowers, pastel icing): Get creative! Fresh edible flowers like pansies or violets and some pastel-colored icing will make your cake look like a spring day!
With these ingredients ready, you’re on your way to creating a stunning cake that captures the essence of spring celebrations. Let’s get baking!
How to Prepare *Spring Decorated Cakes*
Now that we’ve gathered all our ingredients, let’s get started on making your *spring decorated cakes* shine! Follow my step-by-step guide to ensure everything goes smoothly, and trust me, you’ll be amazed at how easy it is to create a delicious masterpiece.
Preheat and Prepare the Pans
The first step is crucial: preheating your oven to 350°F (175°C). Why? This ensures your cake bakes evenly from the get-go. While that’s happening, grease and flour your two 9-inch round cake pans. I like to use a bit of butter to grease them, then sprinkle a little flour, tapping out the excess. This will help your cakes release easily once they’re baked. No one wants a cake that sticks, right?
Creaming the Butter and Sugar
Next up, it’s time to cream together the softened butter and granulated sugar. Grab a sturdy mixing bowl and a hand mixer (or you can do it the old-fashioned way with a wooden spoon, but it takes a bit longer). Beat the butter and sugar together for about 3-5 minutes until the mixture is light and fluffy. You’re looking for a texture that’s pale yellow and airy. This step is super important since it helps create those lovely air pockets that make your cake light and delightful!
Adding Eggs and Vanilla
Now it’s time to add the eggs, one at a time. This is crucial because adding them individually helps emulsify the batter and prevents it from curdling. Mix each egg in thoroughly before adding the next. Don’t forget to pour in that teaspoon of vanilla extract while you’re at it. The aroma will make your kitchen smell heavenly!
Combining Dry Ingredients
In a separate bowl, combine your sifted flour, baking powder, and salt. This is where you want to make sure everything is evenly mixed. Whisk them together until they’re well combined. When you add these dry ingredients to your wet mixture, it ensures that the leavening agent is evenly distributed throughout the batter, which is key for a perfect rise!
Alternating Wet and Dry Mixtures
Now comes the fun part! Gradually add that dry mixture to your wet ingredients, alternating with the milk. Start with a third of the dry mixture, then half of the milk, and repeat until everything is combined. This method helps maintain that lovely fluffy texture while preventing overmixing. Mix just until you see no more dry flour—some lumps are totally okay!
Baking and Cooling
Pour your beautiful batter into the prepared pans, smoothing the tops with a spatula. Pop those pans into your preheated oven and bake for 25-30 minutes. Keep an eye on them! You’ll know they’re done when a toothpick inserted in the center comes out clean. Once they’re baked to perfection, let the cakes cool in the pans for about 10 minutes before transferring them to a wire rack to cool completely. Don’t rush this step; cooling is important for preventing a soggy cake!
Decorating with Spring Themes
Finally, it’s time to unleash your creativity! Once the cakes are completely cool, you can decorate them with pastel icing and fresh edible flowers. I love using buttercream that’s colored in soft pinks and blues for that spring vibe. When placing the flowers, make sure they’re edible and thoroughly washed. A sprinkle of some edible glitter can also add a magical touch! Remember, decorating is about having fun, so let your imagination run wild!
Nutritional Information Section
Now that you’ve created your stunning *spring decorated cakes*, let’s take a moment to talk nutrition! Here’s an estimated breakdown of the nutritional values per serving (that’s one slice, which is about one-twelfth of the cake). Remember, these are estimates, but they give you a good idea of what you’re serving up!
- Calories: 350
- Total Fat: 15g
- Saturated Fat: 9g
- Unsaturated Fat: 4g
- Trans Fat: 0g
- Cholesterol: 70mg
- Sodium: 200mg
- Total Carbohydrates: 50g
- Fiber: 1g
- Sugar: 20g
- Protein: 4g
This delightful cake is a treat, so enjoy it in moderation while celebrating those lovely spring moments. Happy baking!
Tips for Success
Ready to nail your *spring decorated cakes*? I’ve got some pro tips that will help ensure your cake turns out beautifully every time. Trust me, these little tricks make a world of difference!
Use Room Temperature Ingredients
One of the best pieces of advice I can give you is to ensure all your ingredients are at room temperature before you start mixing. This includes the butter, eggs, and milk. When everything is at the same temperature, it mixes together more smoothly, resulting in a better texture and a fluffier cake. I usually take my eggs and milk out of the fridge about an hour before I bake.
Measure Accurately
Precision is key in baking. Use a kitchen scale for the most accurate measurements, especially for the flour. If you’re using measuring cups, make sure to spoon the flour into the cup and level it off with a knife. Packing it down can lead to a dense cake, and nobody wants that!
Don’t Overmix the Batter
When you combine your wet and dry ingredients, be gentle! Overmixing can develop the gluten in the flour, which can make your cake tough instead of light and airy. Mix just until the flour disappears, and don’t worry if there are a few lumps. They’ll bake out!
Check Your Oven Temperature
Ovens can be sneaky! Sometimes they don’t reflect the temperature you set. If you have an oven thermometer, use it to ensure your oven is actually at 350°F (175°C). This small step can save you from cakes that are underbaked or burnt.
Let It Cool Completely
Patience is key when it comes to cooling your cakes. Make sure they’re completely cooled before you even think about frosting them. If you frost a warm cake, the icing will melt and slide right off. Not a pretty sight! Let them hang out on a wire rack until they’re cool to the touch.
Have Fun with Decorations
Lastly, remember that decorating is all about creativity! Don’t stress if it doesn’t look perfect. Use fresh flowers, sprinkles, or even some edible glitter to make it sparkle. Let your personality shine through in your designs. Your guests will appreciate the love you put into making it special!
With these tips in your back pocket, you’re all set to create stunning *spring decorated cakes* that will wow everyone at your celebrations. Happy baking, and enjoy every delicious moment!
Variations on *Spring Decorated Cakes*
Once you’ve nailed the classic *spring decorated cakes*, why not have a little fun and mix things up? There are so many delightful variations you can try that will keep your cakes fresh and exciting for every celebration. Here are a few ideas to inspire your creativity!
Flavor Twists
1. Lemon Zest: Add a burst of spring flavor by mixing in the zest of one or two lemons into your batter. It adds a refreshing tang that pairs beautifully with the sweetness of your cake. You can also swap out some of the milk for fresh lemon juice for an extra citrus kick!
2. Vanilla Bean: For a more sophisticated flavor, try using vanilla bean paste instead of regular vanilla extract. The little flecks of vanilla bean in your cake will give it a gourmet touch and an aromatic depth that’s just divine.
3. Almond Extract: If you love a hint of nuttiness, substitute half the vanilla extract with almond extract. It lends a lovely flavor that’s perfect for spring celebrations, and it pairs wonderfully with floral decorations!
Decorative Ideas
1. Pastel Color Palette: When it comes to icing, think outside the box! Instead of sticking to just pinks and blues, consider using soft lavenders, mint greens, or even a light peach. Mixing colors can create a stunning ombre effect that’s as delightful to look at as it is to eat!
2. Edible Flowers Galore: Get creative with your edible flowers! Instead of just using one type, mix and match. Think about incorporating nasturtiums, marigolds, or even lavender sprigs for a beautiful, colorful presentation. Just remember to ensure all flowers are indeed edible and sourced from a safe place!
3. Whimsical Toppers: Try adding fun toppers to your cake like candy butterflies, chocolate eggs, or sugar flowers. These little accents can make your cake feel festive and are a hit with both kids and adults alike!
With these variations, you can turn your *spring decorated cakes* into a unique masterpiece every time you bake. So go ahead, let your imagination run wild, and create a cake that truly reflects the joy and beauty of spring! Happy baking!
Serving Suggestions
Now that you’ve created your gorgeous *spring decorated cakes*, it’s time to think about what to serve alongside them to enhance the experience. Trust me, the right accompaniments can elevate your cake from delightful to absolutely unforgettable!
Refreshing Beverages
One of my favorite pairings is a lovely cup of tea. A light, floral tea like chamomile or a refreshing mint tea complements the cake’s sweetness beautifully. If you’re feeling adventurous, why not serve it with a fruity iced tea? You can brew your favorite tea and mix it with some fresh fruit slices for added flavor and a pop of color!
Fresh Fruits
Fresh fruit is another fantastic option to serve with your cake. Slices of strawberries, raspberries, or even a mix of citrus fruits like oranges and grapefruits bring a bright, zesty contrast to the sweet, rich cake. I love to arrange the fruit on the side of the plate for a pop of color that really showcases your spring theme!
Light Whipped Cream
Consider adding a dollop of lightly sweetened whipped cream on the side. It’s a classic and adds a creamy texture that pairs perfectly with the cake. Just whip some heavy cream with a touch of sugar and a splash of vanilla until soft peaks form. You can even add a hint of orange or lemon zest to the cream for a delightful twist!
Cheese Plate
If you want to get a little fancy, how about serving your cake with a small cheese plate? Soft cheeses like brie or goat cheese are wonderful choices. Pair them with some honey and nuts for a sweet-savory contrast that will have your guests raving!
Whatever you choose to serve alongside your *spring decorated cakes*, make sure it reflects the joy and beauty of the season. Don’t be afraid to mix and match; the goal is to create a lovely spread that feels festive and inviting. Enjoy every delicious bite with your loved ones, and happy celebrating!
Storing and Reheating Instructions
Once you’ve made your beautiful *spring decorated cakes*, you might be wondering how to keep that delightful freshness for days to come. Don’t worry; I’ve got you covered with some easy storage tips!
First, make sure your cake is completely cooled before storing it. If you try to store a warm cake, you’ll end up with soggy layers, and nobody wants that! Once cooled, if you have any leftovers (which is rare but can happen!), wrap the cake tightly in plastic wrap. This helps keep it moist and prevents it from absorbing any unwanted odors from your fridge.
If you’ve decorated your cake with fresh edible flowers, it’s best to store it in the fridge for a short time, ideally within a couple of days. The flowers can wilt, so if you think you won’t finish it right away, consider decorating just before serving. You can also place a piece of wax paper between the cake and the wrap to protect the decorations.
For longer storage, you can freeze your *spring decorated cakes*! Just wrap individual slices tightly in plastic wrap and then place them in an airtight container or freezer bag. They’ll keep well for about 2-3 months. When you’re ready to enjoy a slice, simply take it out of the freezer and let it thaw in the fridge overnight. This way, you can savor that delightful cake whenever you have a craving!
As for reheating, if you prefer your cake warm, you can pop a slice in the microwave for about 10-15 seconds. Keep an eye on it, though! You don’t want it to get too hot and dry out. Another option is to warm it in the oven at 300°F (150°C) for about 5-10 minutes—this method helps maintain the cake’s moisture while warming it through.
With these simple storing and reheating tips, your *spring decorated cakes* will stay delicious and ready to impress, even days after baking. Enjoy every moment—and every bite!
Print
Spring Decorated Cakes: 7 Joyful Tips for Stunning Creations
- Total Time: 50 minutes
- Yield: 12 servings 1x
- Diet: Vegetarian
Description
A delightful cake decorated for spring celebrations.
Ingredients
- 2 cups all-purpose flour
- 1 1/2 cups granulated sugar
- 1 cup unsalted butter
- 4 large eggs
- 1 cup milk
- 2 teaspoons baking powder
- 1 teaspoon vanilla extract
- 1/2 teaspoon salt
- Spring-themed decorations (edible flowers, pastel icing)
Instructions
- Preheat your oven to 350°F (175°C).
- Grease and flour two 9-inch round cake pans.
- In a bowl, cream together butter and sugar until light and fluffy.
- Add eggs one at a time, mixing well after each addition.
- Stir in vanilla extract.
- In another bowl, combine flour, baking powder, and salt.
- Gradually add dry ingredients to the wet mixture, alternating with milk.
- Pour batter into prepared pans.
- Bake for 25-30 minutes or until a toothpick comes out clean.
- Let cakes cool before decorating with icing and spring decorations.
Notes
- Use fresh edible flowers for a beautiful touch.
- Choose pastel colors for icing to match the spring theme.
- Store the cake in a cool place to maintain freshness.
- Prep Time: 20 minutes
- Cook Time: 30 minutes
- Category: Dessert
- Method: Baking
- Cuisine: American
Nutrition
- Serving Size: 1 slice
- Calories: 350
- Sugar: 20g
- Sodium: 200mg
- Fat: 15g
- Saturated Fat: 9g
- Unsaturated Fat: 4g
- Trans Fat: 0g
- Carbohydrates: 50g
- Fiber: 1g
- Protein: 4g
- Cholesterol: 70mg
Keywords: spring decorated cakes